1. Authentication
The Authentication settings allow administrators to control how users sign in to the DataKook platform. By default, DataKook ships with a built-in Login & Password authentication method, but you can seamlessly switch to an enterprise identity provider to enforce single sign-on (SSO), multi-factor authentication, and centralized credential management.
DataKook supports the following authentication methods:
- Login & Password — The default built-in method. Users receive their initial credentials via email and can change their password afterward.
- OpenID Connect — A modern, standards-based protocol supported by most enterprise identity providers.
- SAML — The Security Assertion Markup Language protocol, widely used in corporate environments for browser-based SSO.
- Okta — Direct integration with the Okta identity platform for streamlined workforce identity management.
- Azure AD — Native integration with Microsoft Entra ID (formerly Azure Active Directory) for organizations on the Microsoft ecosystem.
Switching the authentication method takes effect immediately for all users. Make sure you have completed the configuration with your identity provider before activating the new method to avoid locking users out of the platform.
1.1 OpenID Connect
OpenID Connect (OIDC) is an identity layer built on top of the OAuth 2.0 protocol. It enables DataKook to delegate authentication to any compliant identity provider — such as Keycloak, Auth0, Ping Identity, or Google Workspace — while retaining full control over authorization within the platform.
When you select OpenID Connect, DataKook automatically generates and displays the Redirect URI. Copy this URI and register it in your identity provider's application configuration so that the authentication callback is directed back to DataKook.
You will then need to provide the following parameters:
- Authorization Endpoint — The URL where users are redirected to authenticate (e.g.,
https://idp.example.com/authorize). - Token Endpoint — The URL DataKook calls to exchange the authorization code for an access token.
- User Information Endpoint — The URL DataKook queries to retrieve the authenticated user's profile information.
- Client ID — The unique identifier assigned to the DataKook application by your identity provider.
- Client Secret — The confidential key used to authenticate DataKook with the identity provider during the token exchange.
- Scopes — The permissions requested during authentication. The
emailscope is mandatory because DataKook uses the user's email address as the primary identifier to match the authenticated session with an existing user account.
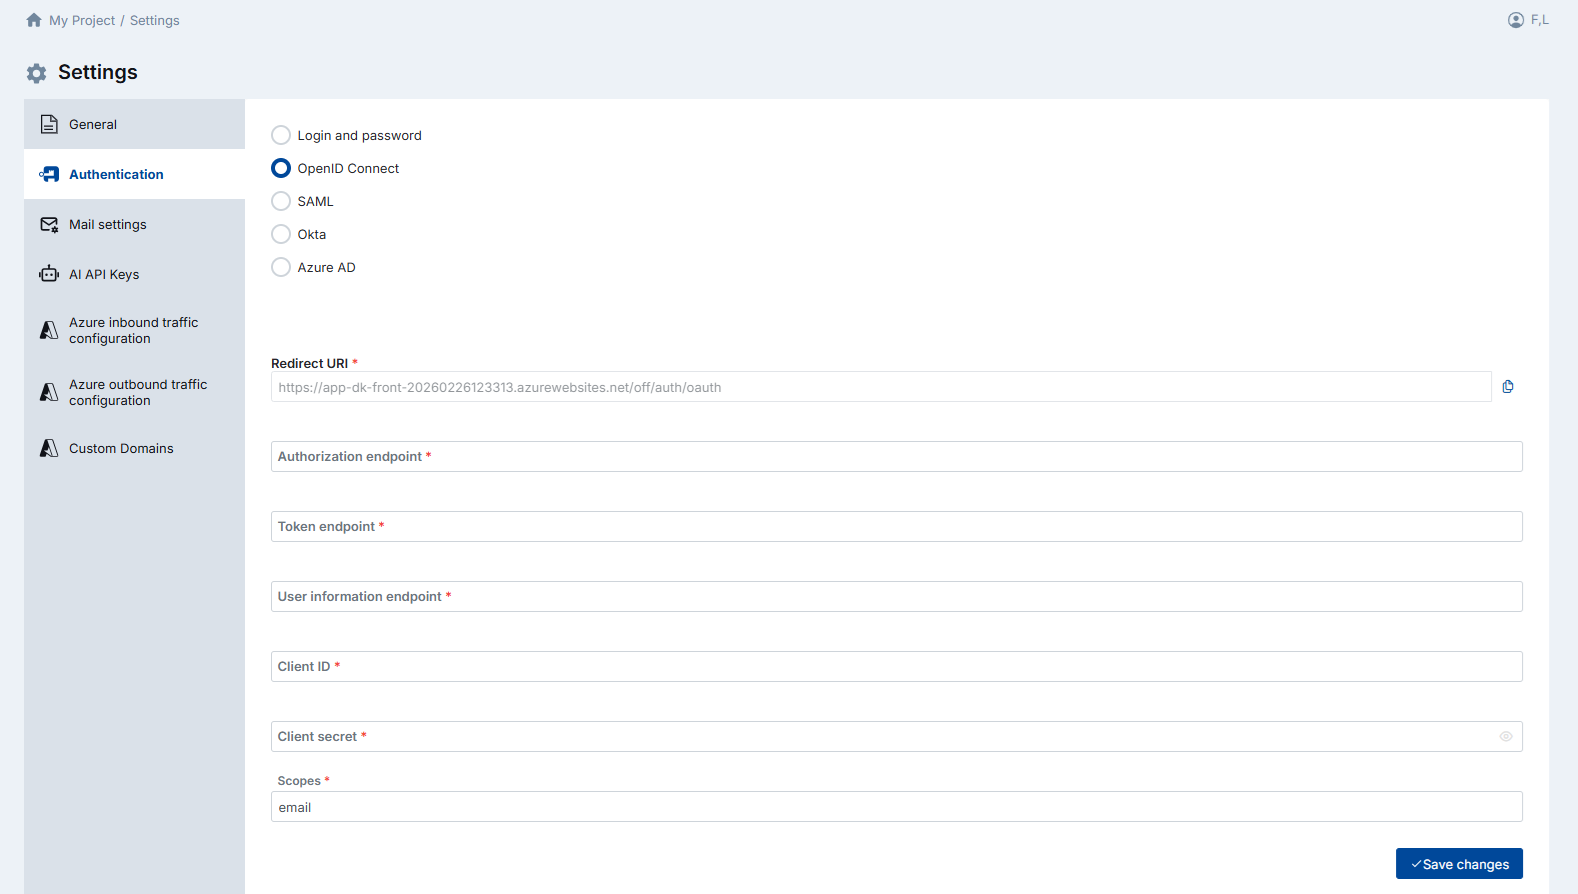
email claim is returned by your identity provider. If the email is not included in the token or user-info response, authentication will fail because DataKook cannot map the external identity to a platform user.
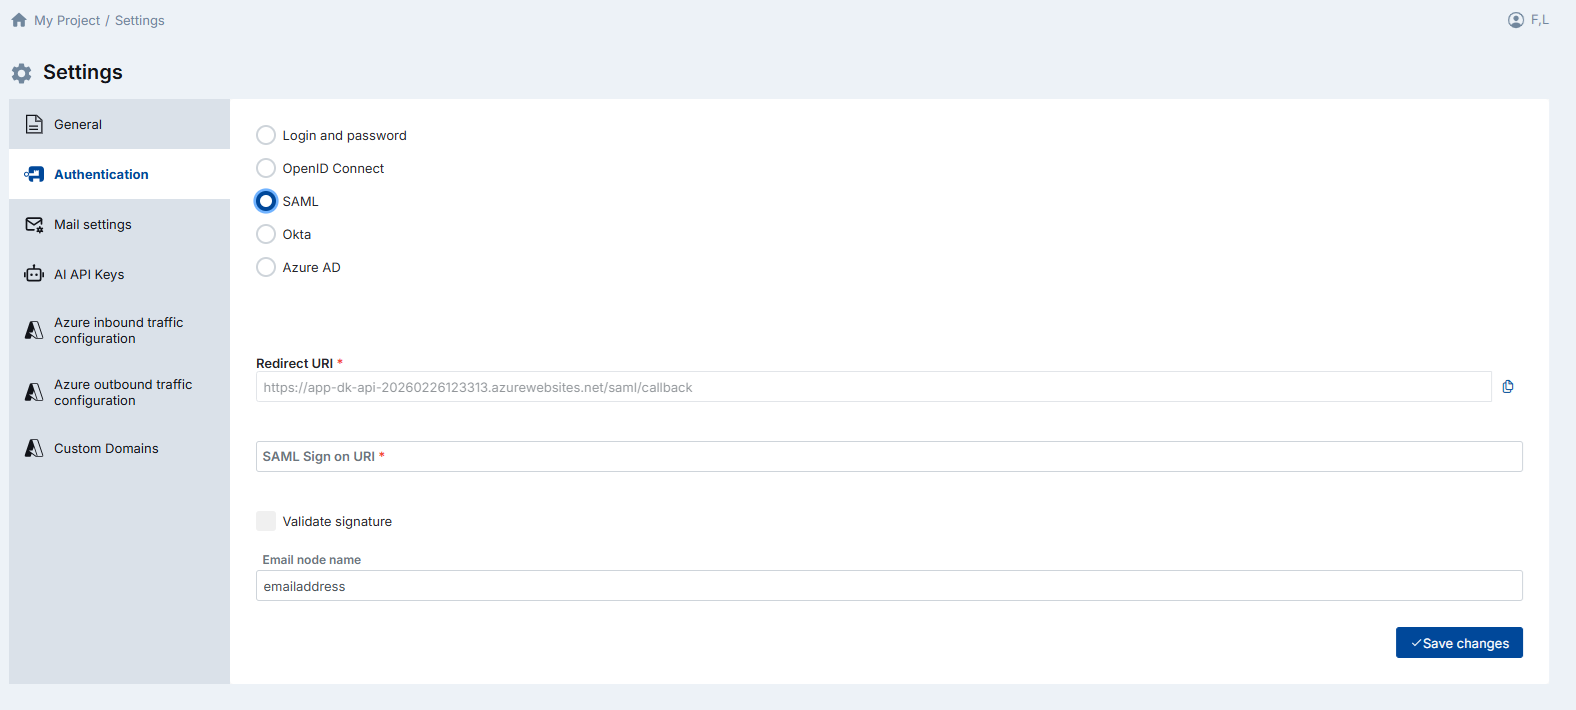
1.2 SAML
SAML (Security Assertion Markup Language) is a widely adopted XML-based standard for exchanging authentication and authorization data between an identity provider (IdP) and a service provider (SP). Many large enterprises use SAML for browser-based single sign-on across all internal applications.
DataKook acts as the Service Provider. When you select SAML, the platform displays the Redirect URI (also called the Assertion Consumer Service URL). Register this URI with your identity provider so that SAML assertions are posted back to DataKook after the user authenticates.
Configure the following fields:
- SAML Sign-On URI — The identity provider's single sign-on URL where DataKook redirects users to initiate authentication.
- Validate Signature — Enable this option if you want DataKook to verify the cryptographic signature of the SAML assertion. This is recommended in production environments to prevent assertion tampering.
- Email Node Name — The name of the SAML attribute that contains the user's email address. By default this is set to
emailaddress. If your IdP uses a different attribute name (e.g.,http://schemas.xmlsoap.org/ws/2005/05/identity/claims/emailaddress), update this field accordingly. This value is critical — DataKook uses it to identify and match the authenticated user to an existing platform account.
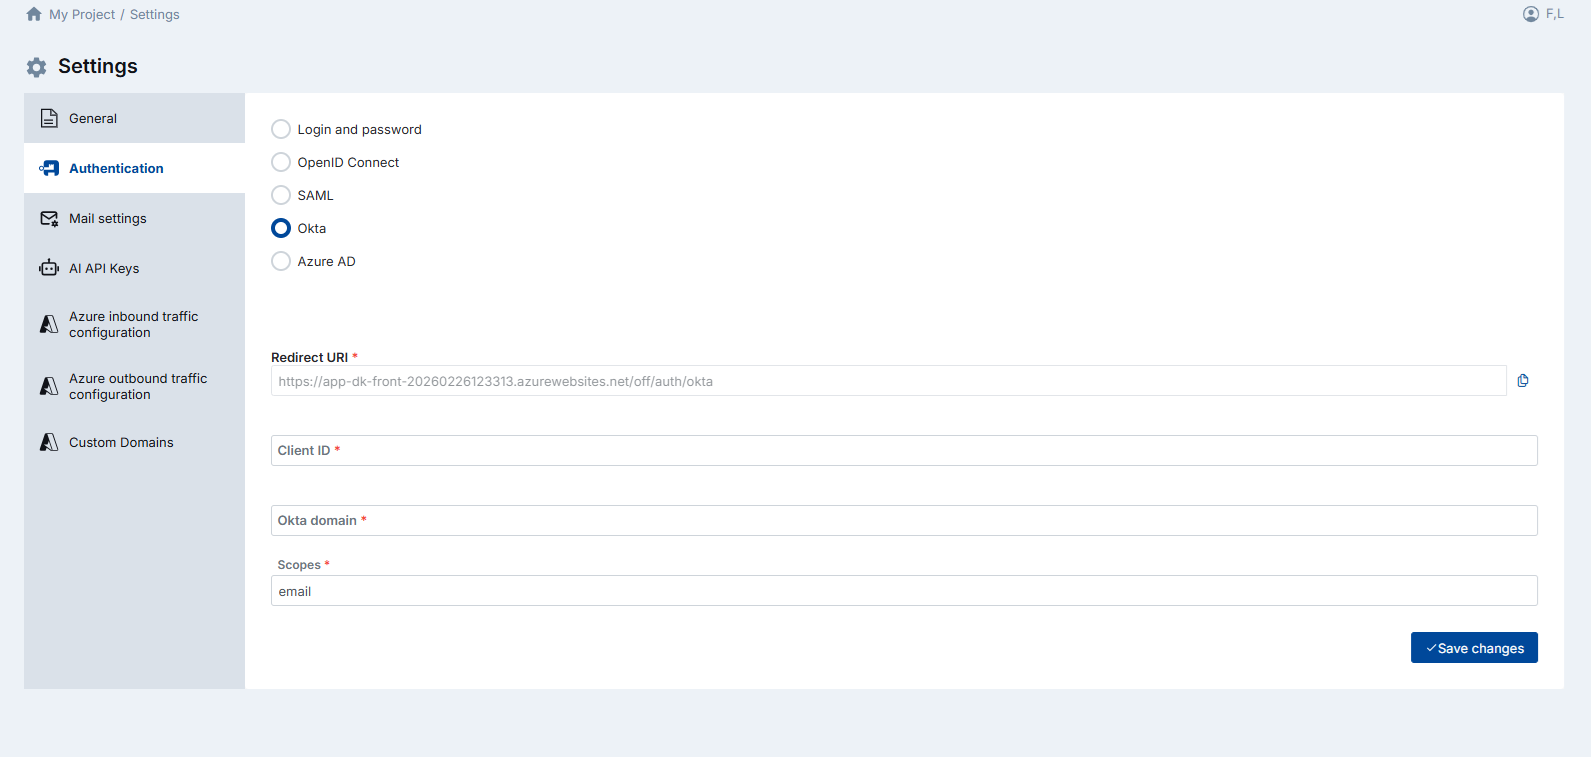
1.3 Okta
Okta is a leading cloud-based identity and access management platform. DataKook offers a dedicated Okta integration that simplifies SSO setup by requiring only a few parameters rather than a full OIDC or SAML configuration.
As with other methods, DataKook provides the Redirect URI upfront. Register it in your Okta application's sign-in redirect URIs, then fill in the following fields:
- Client ID — The client identifier assigned to the DataKook application in the Okta Admin Console.
- Okta Domain — Your organization's Okta domain (e.g.,
yourcompany.okta.com). DataKook uses this to construct the authorization, token, and user-info endpoints automatically. - Scopes — The permissions requested during authentication. The
emailscope is mandatory so that DataKook can retrieve the user's email address to match the identity with an existing platform account.
1.4 Azure AD
Microsoft Entra ID (formerly Azure Active Directory) is the identity backbone for organizations that use Microsoft 365, Azure, and other Microsoft cloud services. DataKook's native Azure AD integration makes it easy to add DataKook to your existing corporate SSO landscape.
DataKook displays a Redirect URI when Azure AD is selected. You must register this URI in Azure and provide two parameters:
- Client ID — The Application (client) ID of the DataKook app registration in Azure AD.
- Tenant ID — The Directory (tenant) ID of your Azure AD tenant, which identifies your organization.
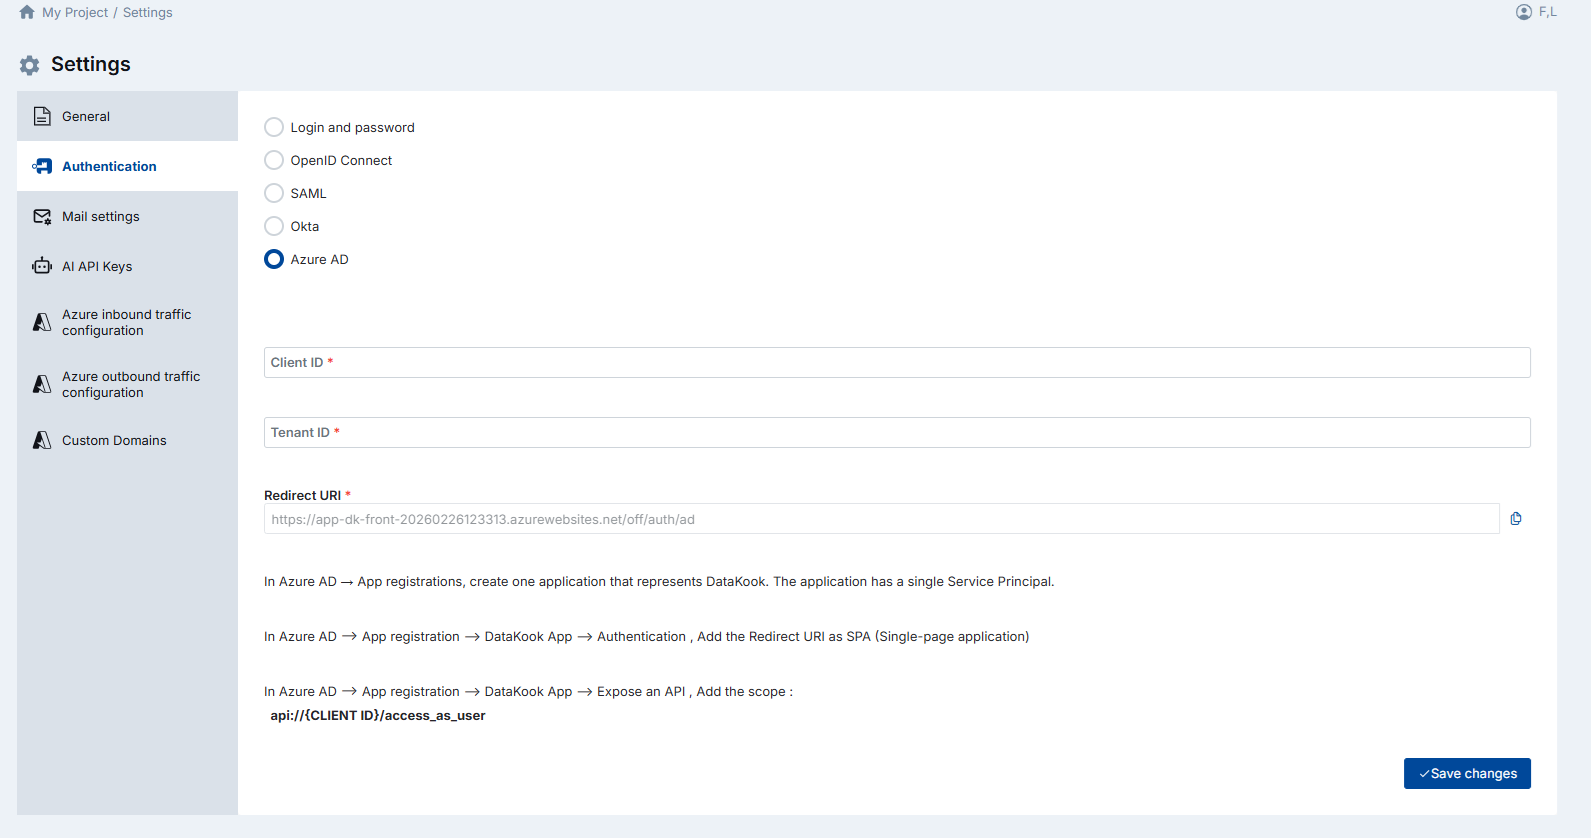
Azure AD Configuration Steps
Follow these steps in the Azure Portal to complete the integration:
- Create an App Registration: In Azure AD → App registrations, create a new application that represents DataKook. This application has a single Service Principal that DataKook uses for authentication.
- Add the Redirect URI: Navigate to your DataKook App Registration → Authentication. Add the Redirect URI displayed by DataKook as a Single-page application (SPA) platform redirect.
-
Expose an API scope: Go to your DataKook App Registration → Expose an API. Add a new scope with the value:
api://{CLIENT_ID}/access_as_user. This scope authorizes DataKook to act on behalf of the authenticated user.
2. Mail Settings
The Mail Settings configure how DataKook sends transactional emails — such as new-user credential invitations, password reset links, and system notifications. DataKook supports multiple email delivery providers so you can choose the one that best fits your enterprise infrastructure.
If your organization uses an external identity provider (OpenID Connect, SAML, Okta, or Azure AD), email configuration is optional but still recommended for password-reset workflows and platform notifications.
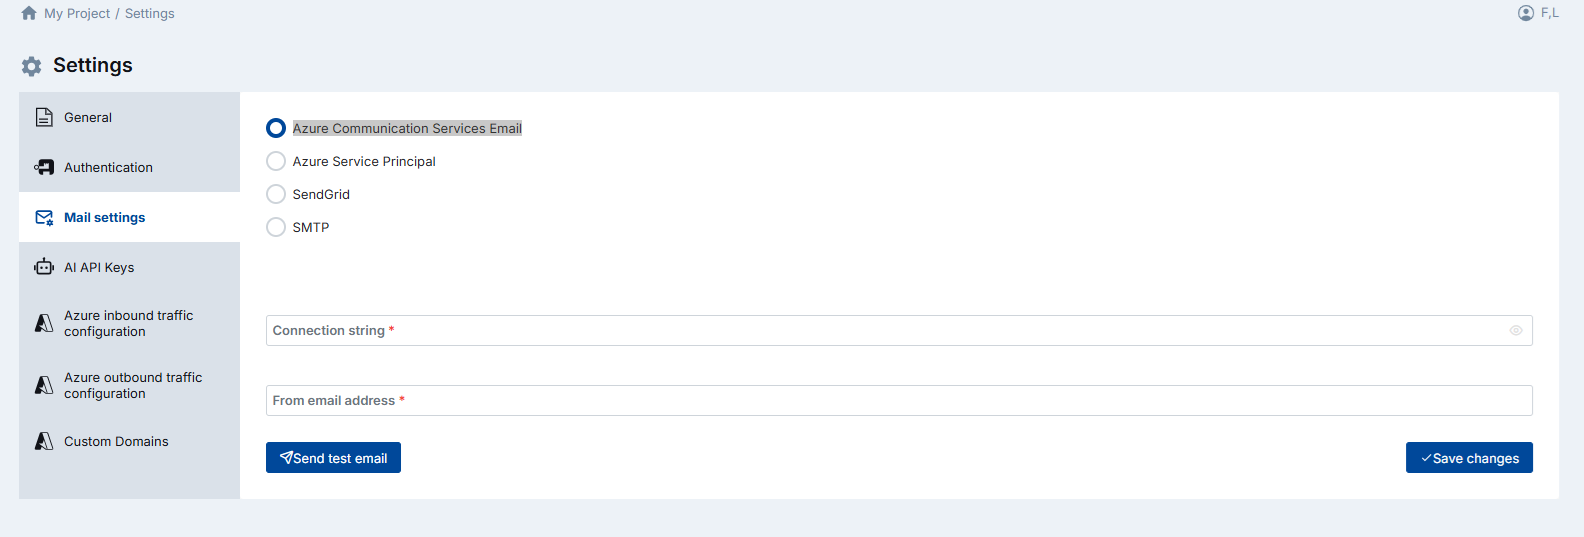
2.1 Azure Communication Services Email
Azure Communication Services (ACS) provides a cloud-native email delivery pipeline that integrates natively with the Azure ecosystem. This option is ideal for organizations already running workloads on Azure and looking for a fully managed, scalable email solution without managing SMTP infrastructure.
To configure ACS email delivery, provide:
- Connection String — The primary connection string from your Azure Communication Services resource. You can find this in the Azure Portal under the resource's Keys blade.
- From Email Address — The sender address that will appear in outgoing emails (e.g.,
no-reply@yourcompany.com). This address must be verified and authorized in your ACS Email resource.
2.2 Azure Service Principal
This method uses a Microsoft Graph API call authenticated via an Azure Service Principal to send emails through a Microsoft 365 mailbox. It is well suited for enterprises that prefer to route all outbound email through their existing Exchange Online / Microsoft 365 infrastructure without exposing SMTP credentials.
Provide the following credentials:
- User ID — The Object ID or User Principal Name of the Microsoft 365 mailbox that will send emails on behalf of DataKook.
- Service Principal Client ID — The Application (client) ID of the Azure AD app registration used for mail sending.
- Service Principal Client Secret — The client secret associated with the app registration. Store this securely; it is used to authenticate API calls.
- Tenant ID — Your Azure AD tenant identifier.
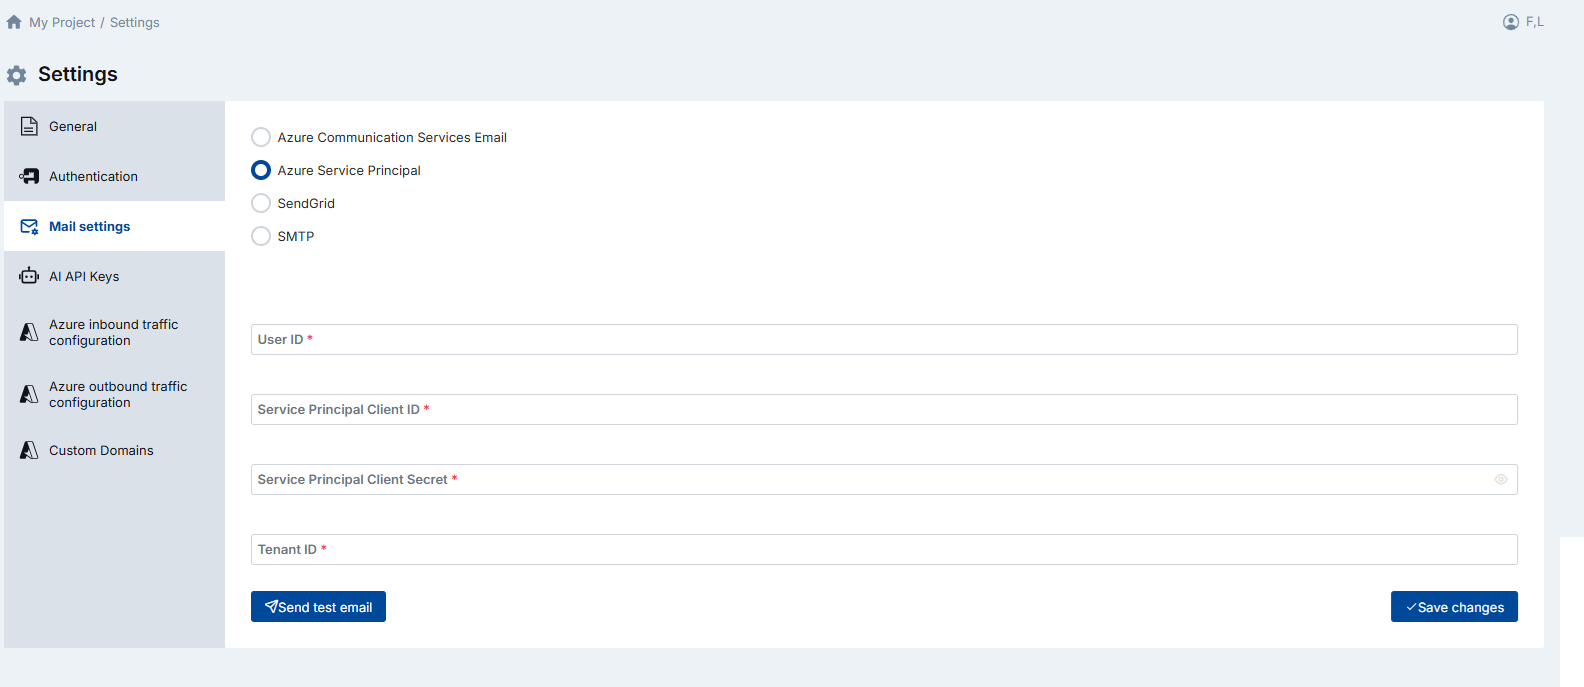
Mail.Send application permission in Microsoft Graph, and that an admin has granted consent for this permission in the Azure Portal.
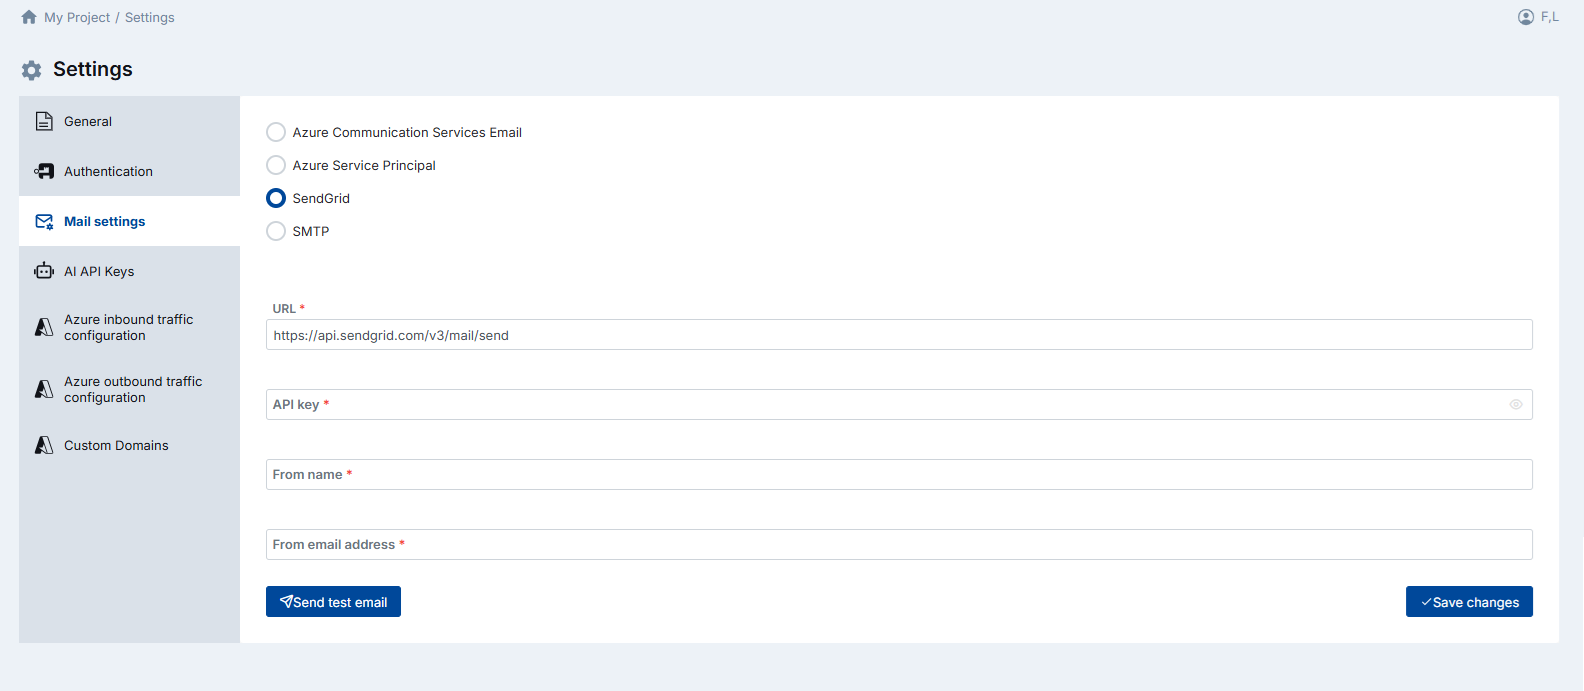
2.3 SendGrid
SendGrid (by Twilio) is a popular cloud-based email delivery platform known for its high deliverability rates and developer-friendly API. If your organization already uses SendGrid for transactional or marketing email, you can leverage the same account for DataKook.
Configure the following fields:
- SendGrid URL — The SendGrid API endpoint (typically
https://api.sendgrid.com/v3/mail/send). - API Key — A SendGrid API key with Mail Send permissions. It is recommended to create a dedicated restricted key for DataKook rather than using a full-access key.
- From Name — The display name shown to email recipients (e.g.,
DataKook Platform). - From Email Address — The verified sender email address that appears in the From field of outgoing messages.
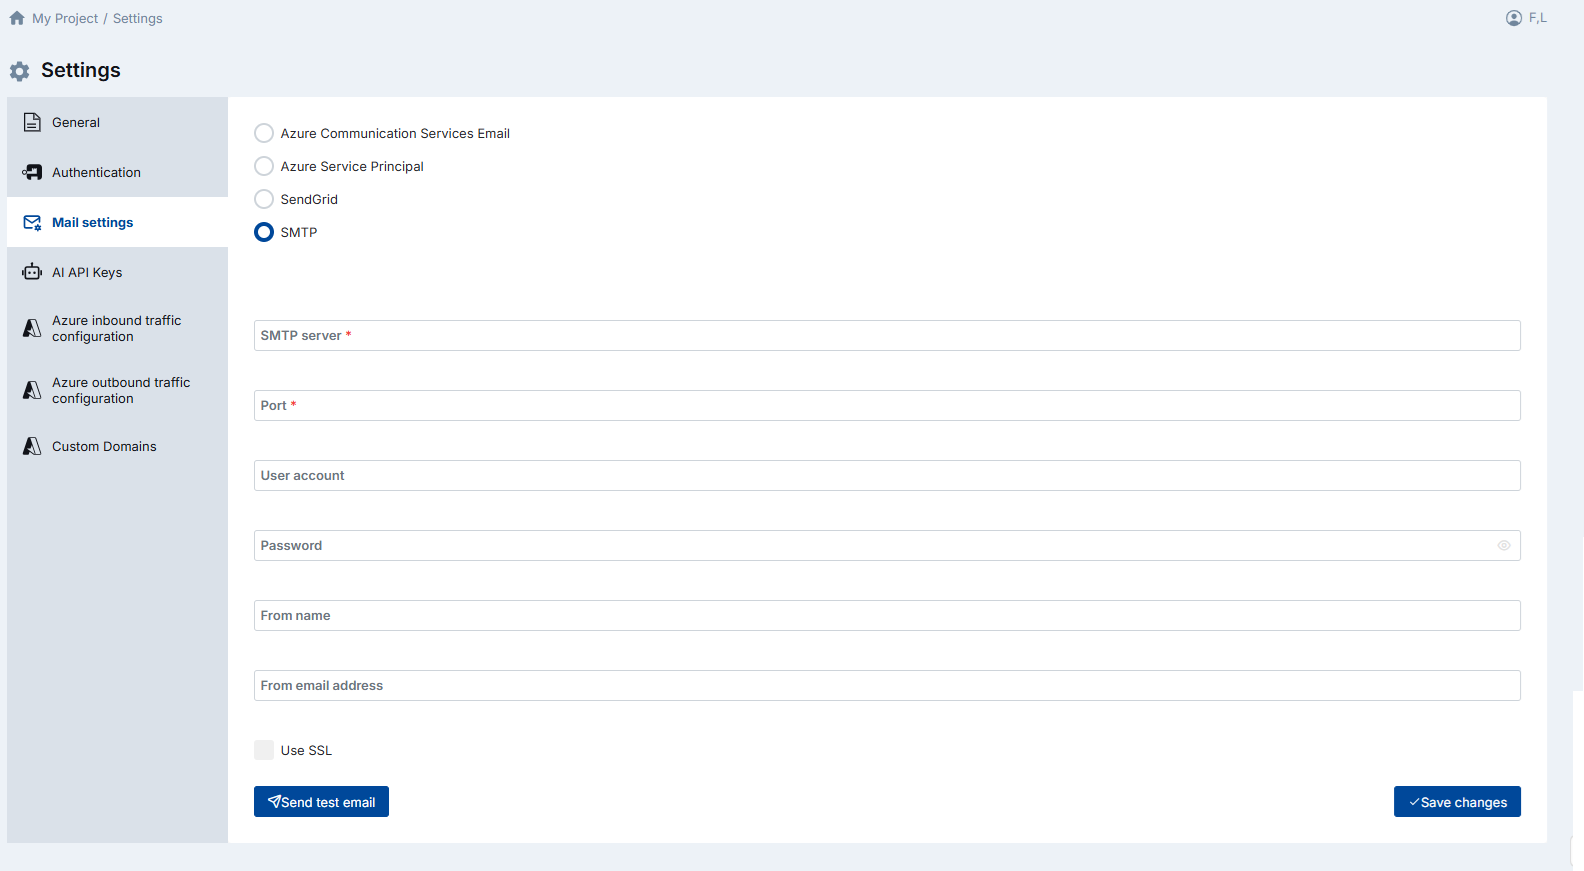
2.4 SMTP
SMTP (Simple Mail Transfer Protocol) is the universal standard for email transmission. Choose this option when you want to use your own mail server, an on-premises Exchange relay, or any third-party SMTP service that is not covered by the dedicated integrations above.
The following fields are available:
- SMTP Server (mandatory) — The hostname or IP address of your SMTP server (e.g.,
smtp.yourcompany.com). - Port (mandatory) — The port used for SMTP communication. Common values are
25(unencrypted),465(implicit TLS), or587(STARTTLS). - Username / Password — Credentials for SMTP authentication. Some relay servers on internal networks may not require authentication; leave these blank if your server allows unauthenticated relay.
- Additional options — Depending on your server configuration, you may need to enable TLS or configure a custom sender address.
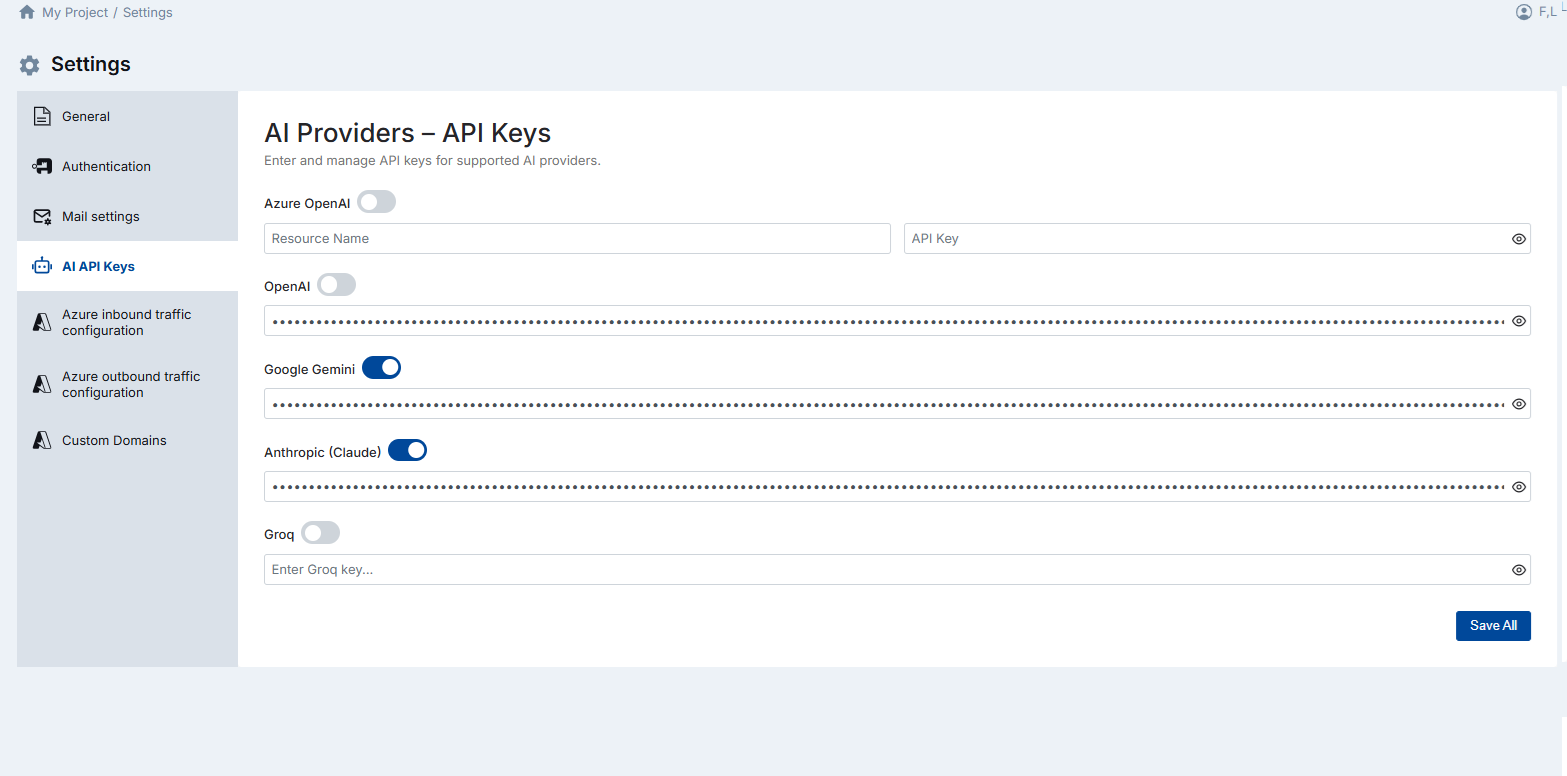
3. AI API Keys
DataKook includes built-in AI capabilities — such as natural-language-to-SQL, intelligent data summaries, and automated insights — powered by large language models. The platform ships with a generous allocation of free AI tokens that are sufficient for typical day-to-day usage.
If your team plans extensive or high-volume AI usage — for example, batch processing large datasets with AI-driven transformations or embedding AI queries into automated workflows — you can register your own API keys to avoid any token-limit constraints.
DataKook supports multiple AI providers. You can configure keys for any or all of them:
- OpenAI — Use your own OpenAI API key for access to GPT models.
- Azure OpenAI — Connect to Azure-hosted OpenAI deployments with your Azure subscription credentials.
- Other supported providers — Additional providers may be available depending on your DataKook version.
Only activated providers are visible to end users in the AI feature selection. Deactivate a provider at any time to remove it from the user-facing options without deleting the stored API key.
4. Azure Network Configuration
DataKook runs on Azure App Services and provides granular control over both inbound and outbound network traffic. These settings let you enforce network-level security policies — from public internet access, to IP-restricted access, to fully private connectivity using Azure Private Endpoints.
The DataKook platform is composed of three main web applications, each of which must be configured consistently:
- Front End — The browser-facing user interface application.
- Back End (Main API) — The core platform API that handles authentication, business logic, and orchestration.
- REST DB API — The dedicated service that exposes your database REST APIs to consumers.
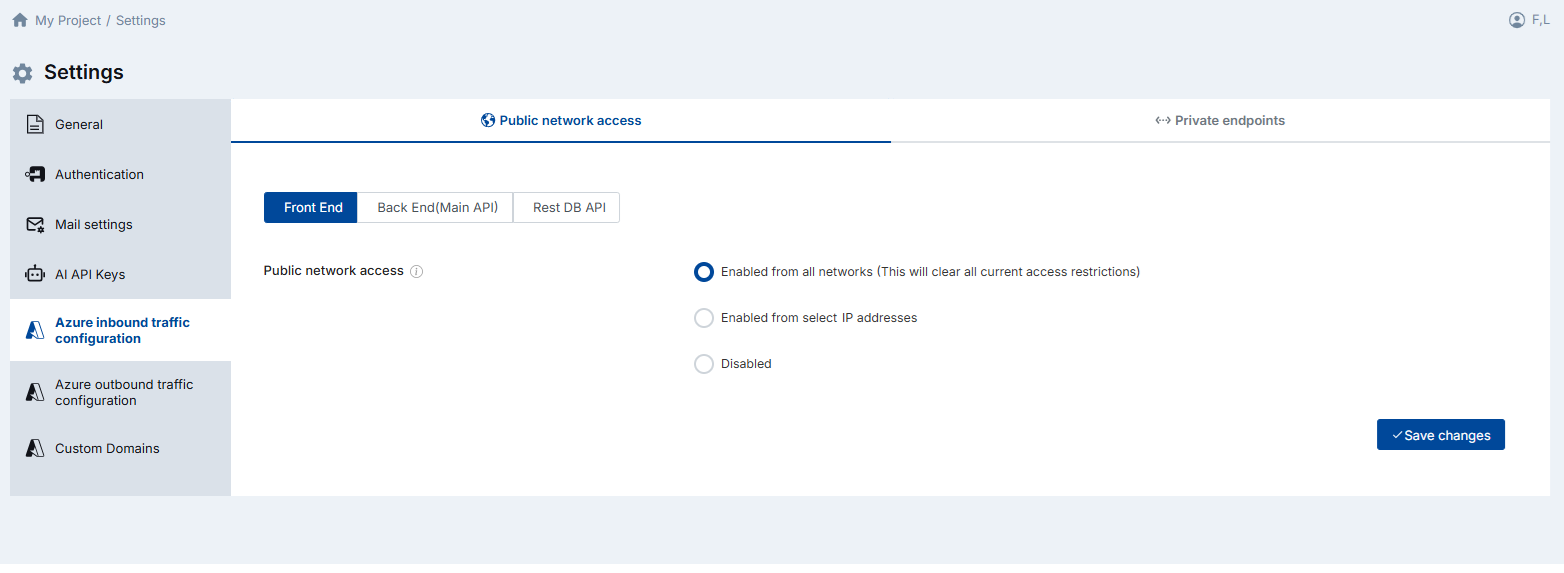
4.1 Public Network Access
This setting controls whether the three DataKook applications are reachable from the public internet. You can choose from three modes:
- Enabled from all networks — The default setting. All three web applications accept traffic from any IP address on the public internet. Suitable for development environments or organizations without strict network perimeter requirements.
- Enabled from select IP addresses — Only traffic from explicitly whitelisted IP addresses or CIDR ranges is allowed. All other inbound traffic is denied. Use this mode to restrict access to your corporate office IPs, VPN egress addresses.
- Disabled — Public network access is completely turned off. The applications are reachable only through Azure Private Endpoints. This is the most secure option and is recommended for production deployments in regulated industries.
4.2 Private Endpoints
Azure Private Endpoints allow you to access the DataKook web applications exclusively over your organization's private virtual network, without exposing any traffic to the public internet. This is the recommended configuration for enterprise production deployments.
Because DataKook consists of three distinct web applications, you need to create three separate Private Endpoints — one for the Front End, one for the Back End, and one for the REST DB API.
For each Private Endpoint:
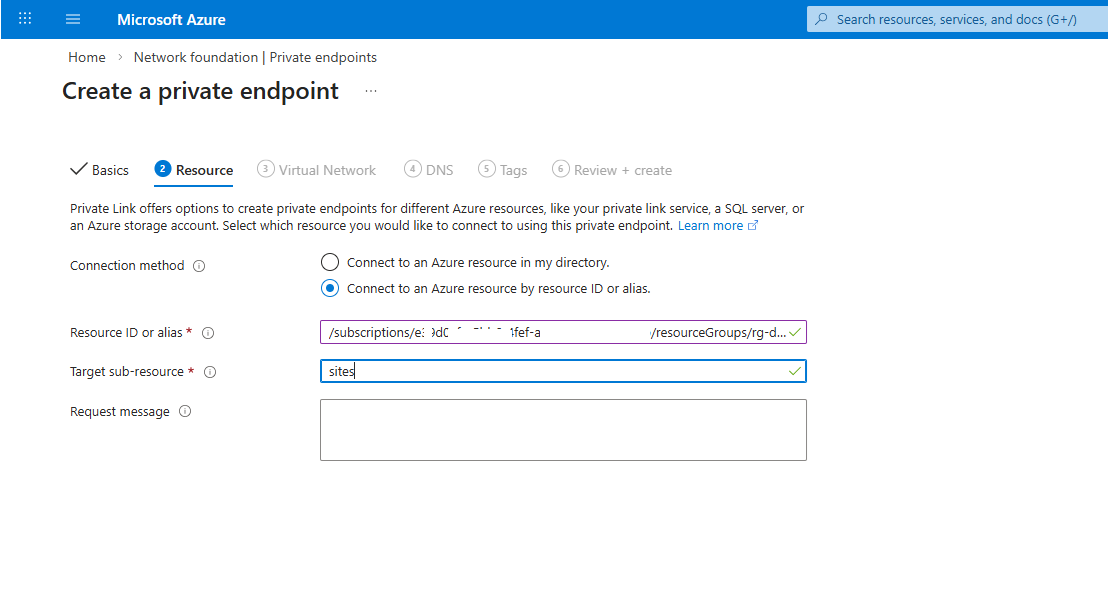
- In DataKook Settings, copy the Resource ID displayed for the target application.
- In the Azure Portal, create a new Private Endpoint. Set the Target sub-resource to
sites. - Paste the Resource ID into the Resource field and complete the provisioning wizard.
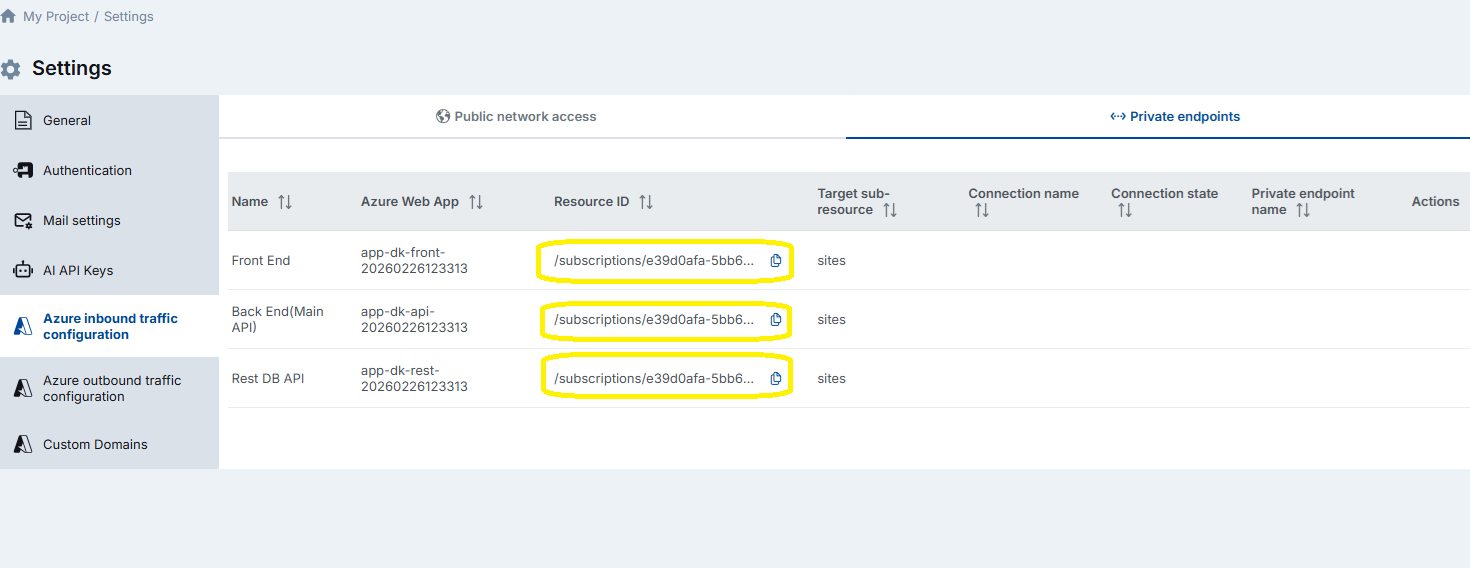
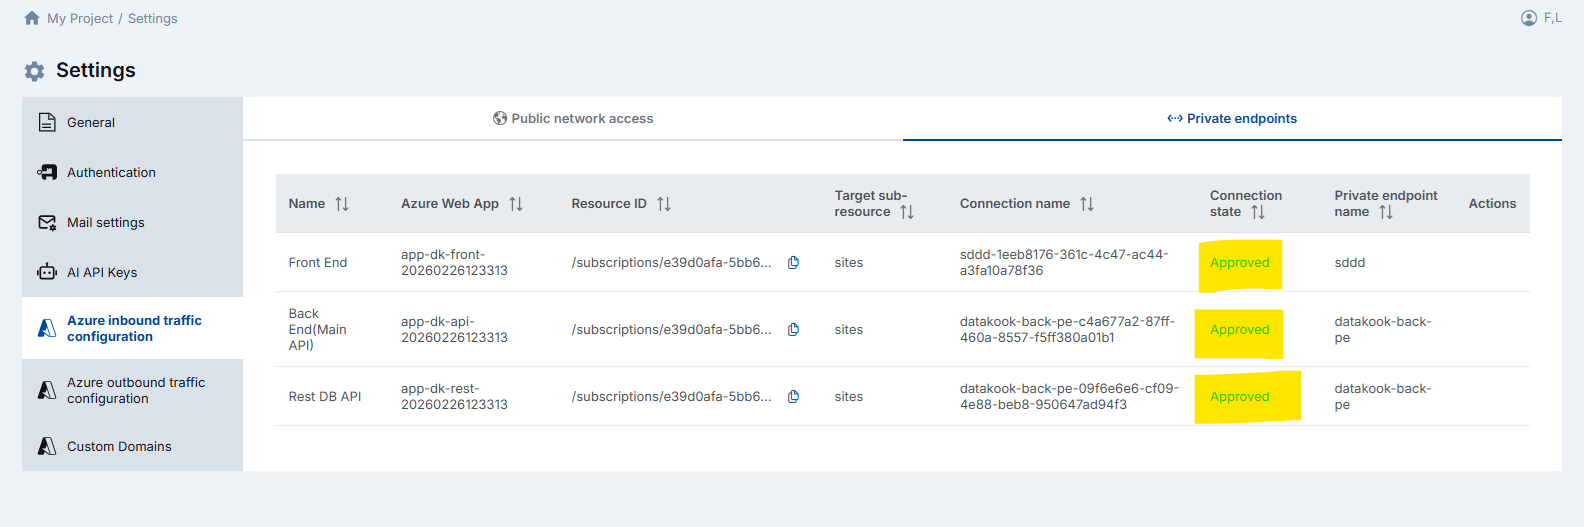
After creation, the three endpoints appear in DataKook's settings with a Pending connection state. This is expected — the endpoints must be formally approved before they become active.
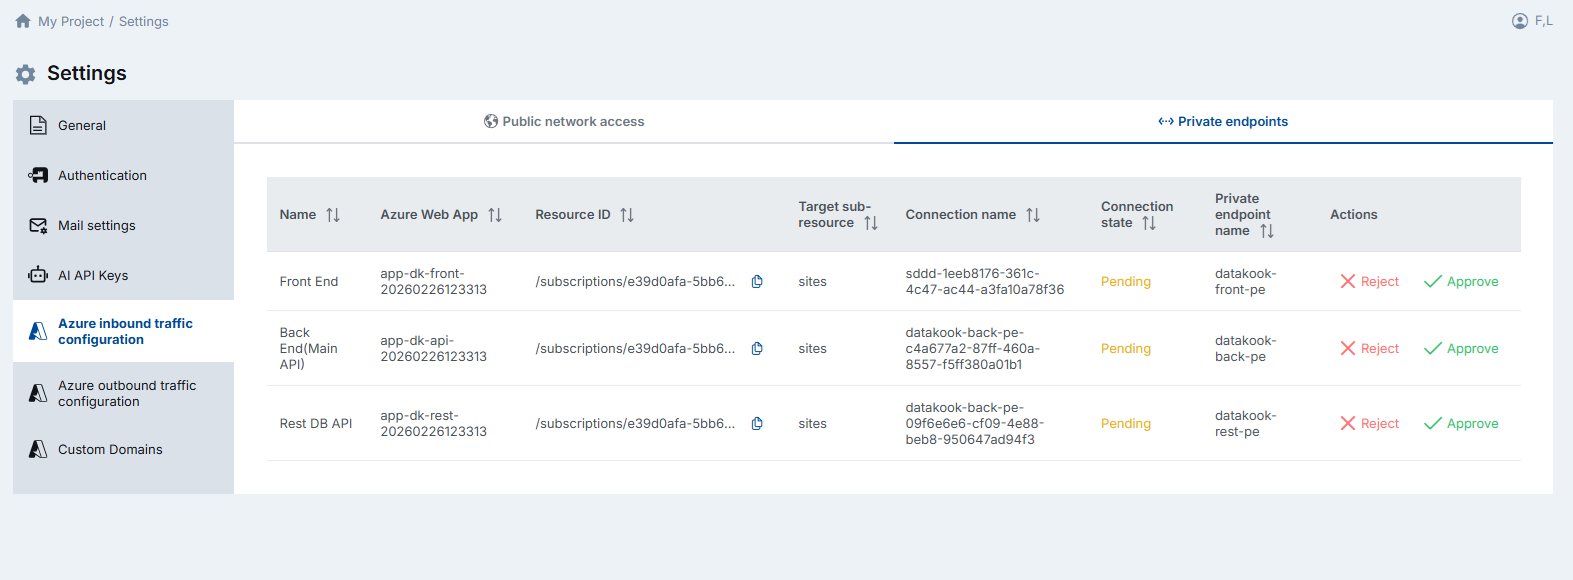
Approve all three endpoints. Once the connection state transitions to Approved, your private connectivity is live and DataKook is accessible through these endpoints.
4.3 Outbound Traffic Configuration
Outbound traffic configuration comes into play when you need to connect DataKook to a database whose public access is disabled — for example, an Azure SQL Database or Azure Database for PostgreSQL that is locked down to private connectivity only.
There are two approaches to establish connectivity:
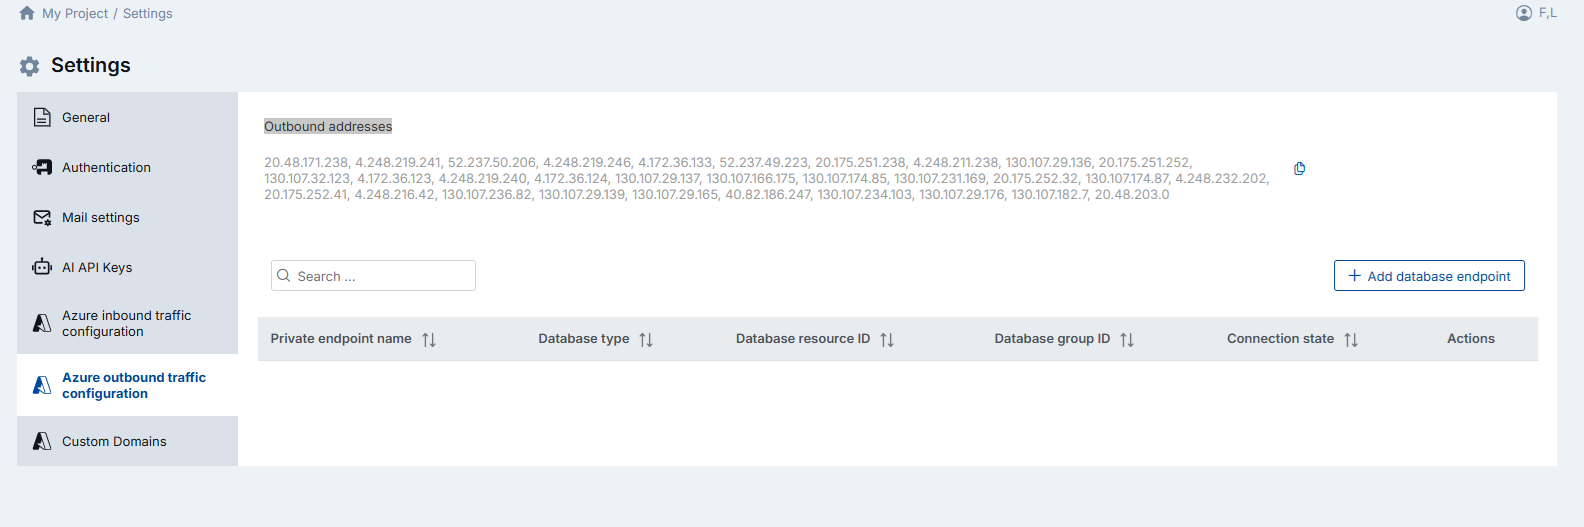
- IP Whitelisting — Add DataKook's outbound IP addresses to your database's network allow-list. DataKook displays its current outbound IPs in this settings screen. This is the simpler option but requires the target database to accept connections from specific public IPs.
- Private Endpoint (VNet Integration) — Create a Private Endpoint from DataKook directly to your database. This routes traffic entirely over Microsoft's private backbone network and is the recommended approach for production workloads.
To create an outbound Private Endpoint to a database:
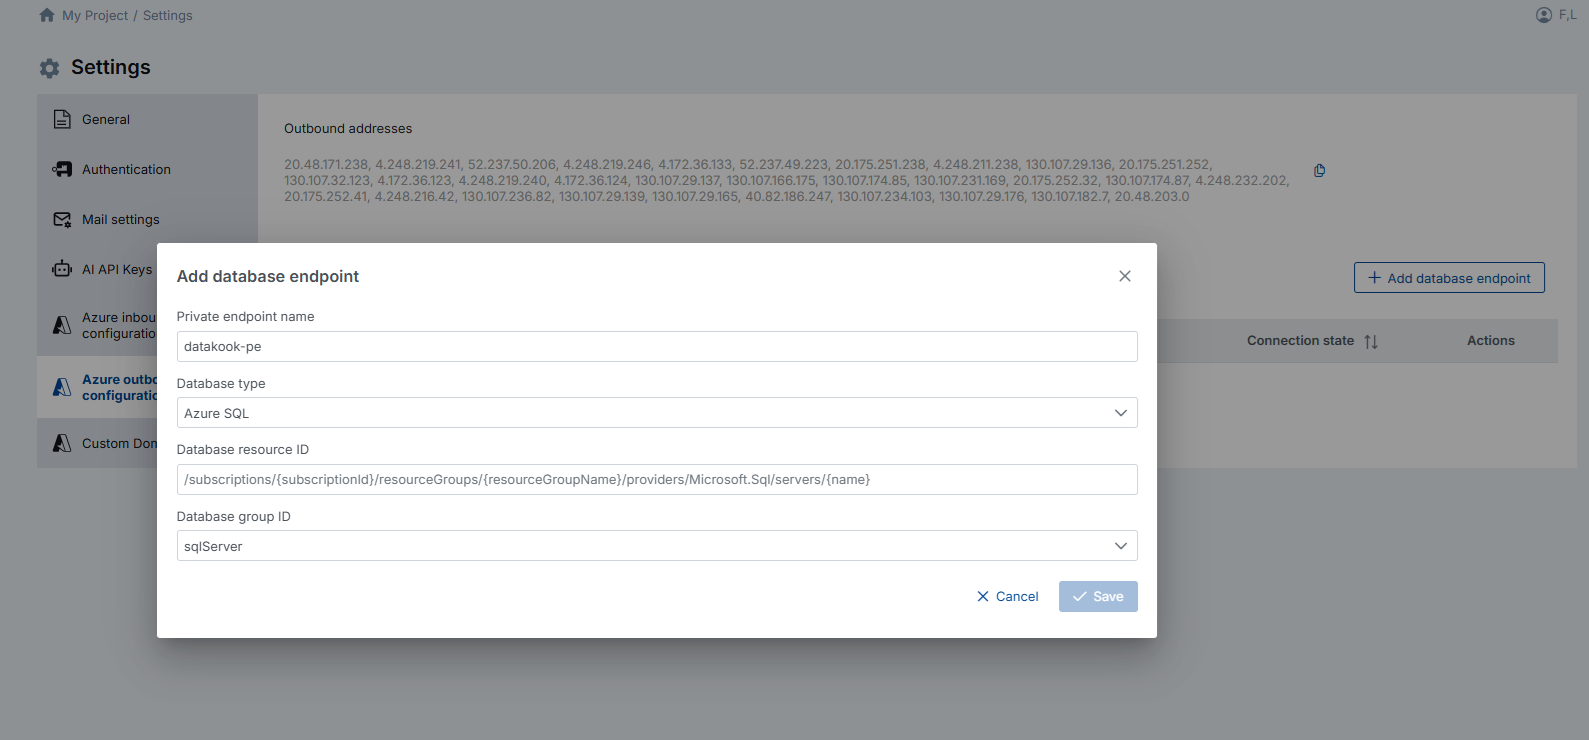
- Click Add Database Endpoint.
- Enter a descriptive Private Endpoint name (e.g.,
pe-datakook-to-sqlprod). - Select the Database type (SQL Server, PostgreSQL, MySQL, etc.).
- Enter the Database Resource ID — the Azure resource path. For example, for an Azure SQL Server:
/subscriptions/{subscriptionId}/resourceGroups/{resourceGroup}/providers/Microsoft.Sql/servers/{serverName} - Choose the Database Group ID — the target sub-resource type appropriate for your database engine.
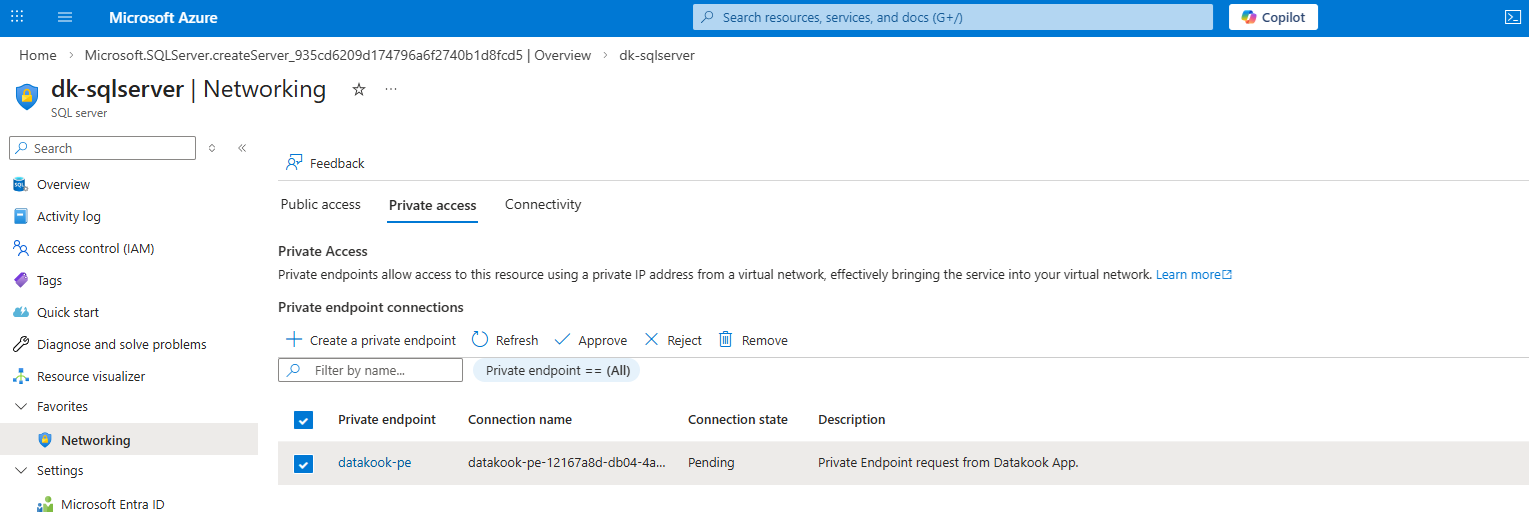
The newly created endpoint initially appears in a Pending state. This is the expected behavior while the connection awaits approval from the database resource owner.
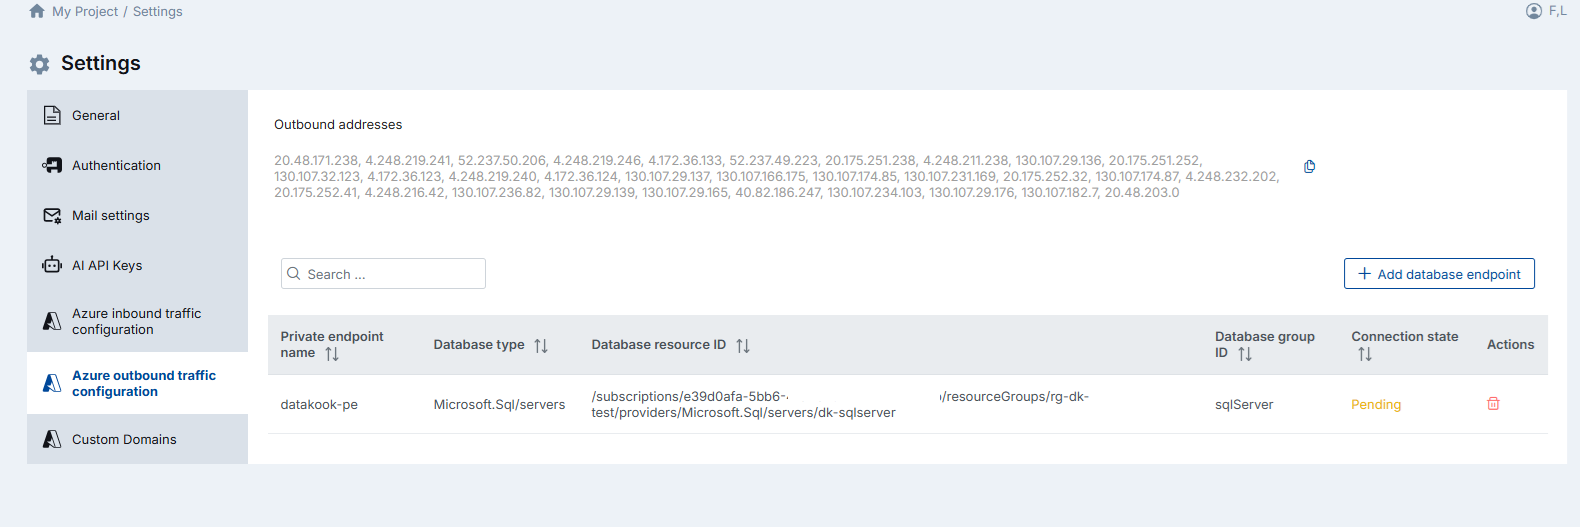
Navigate to the target database's Networking menu in the Azure Portal and Approve the incoming Private Endpoint connection. Once approved, the private link between DataKook and your database is fully established and traffic flows securely over the Azure private network.
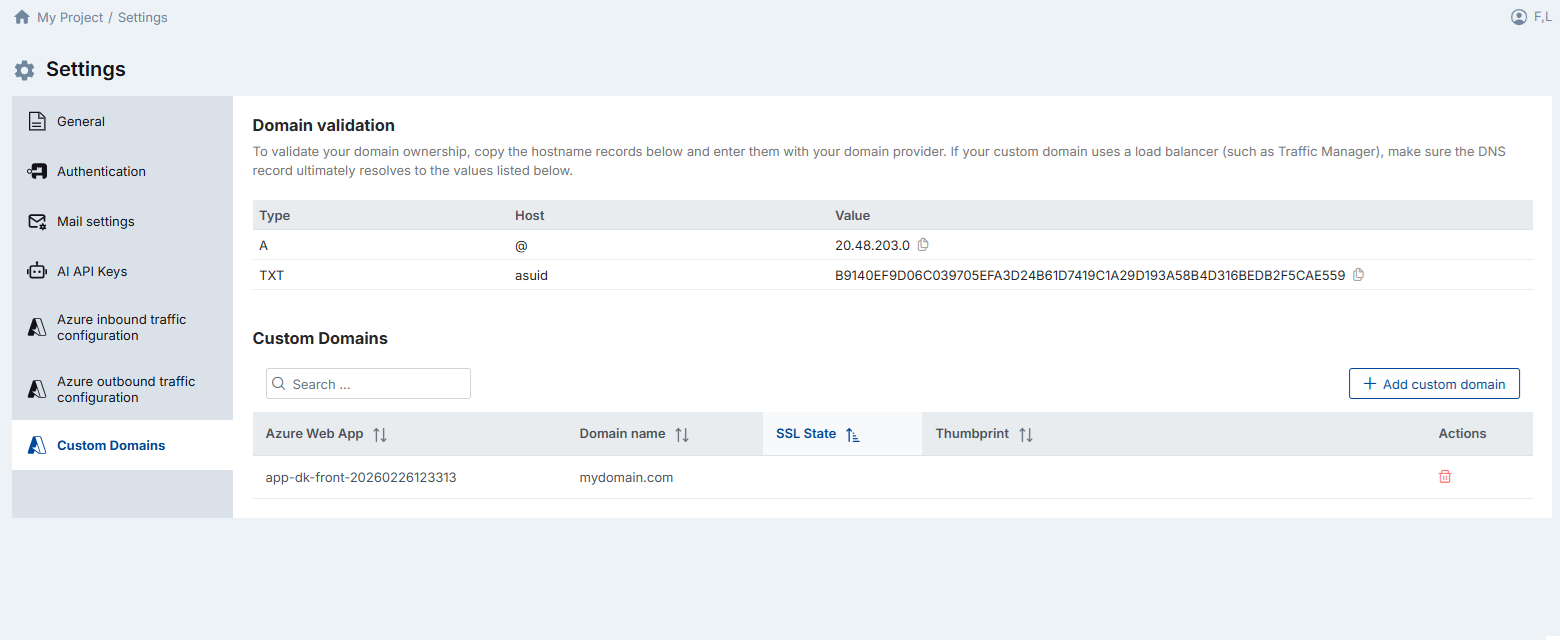
4.4 Custom Domains
By default, DataKook is accessible through an Azure-assigned URL (e.g., yourinstance.azurewebsites.net). If you prefer a branded, professional domain — such as datakook.yourcompany.com — you can configure a custom domain with automatic SSL certificate management.
Setting up a custom domain involves two steps:
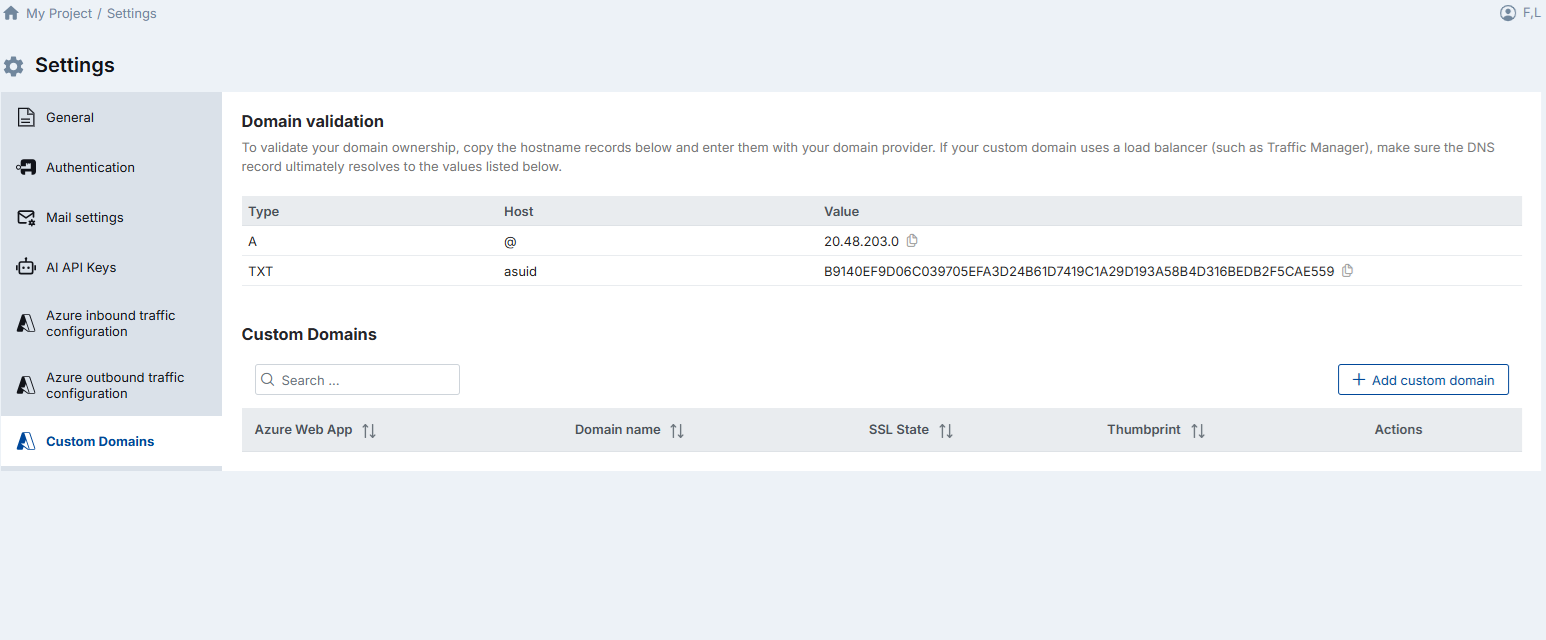
- Validate domain ownership: DataKook displays two DNS records — an A record and a TXT record — that you must add to your domain's DNS configuration through your domain registrar or DNS provider. If your custom domain routes through a load balancer (such as Azure Traffic Manager), make sure the DNS record ultimately resolves to the values listed in DataKook's configuration screen.
- Add the custom domain: Once the DNS records have propagated, click Add Custom Domain, enter your domain name, and save. DataKook will verify the DNS records and provision an SSL certificate automatically.
If the domain has been added successfully, the SSL State column displays SniEnabled and a Thumbprint value appears — confirming that the SSL certificate is bound and the domain is fully active.
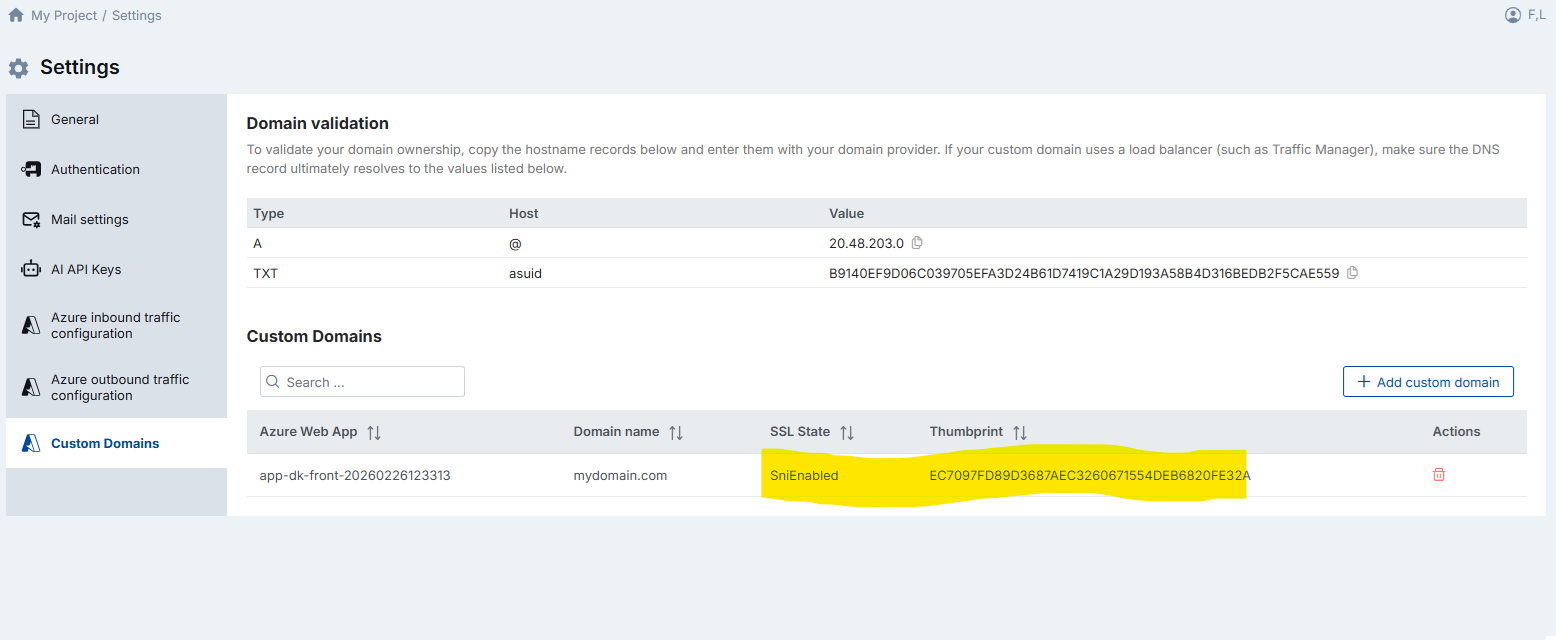
If the SSL State and Thumbprint columns remain empty after adding the domain, the binding did not complete successfully. In this case, delete the domain entry and add it again. This typically resolves transient provisioning issues.